
1、模型部分
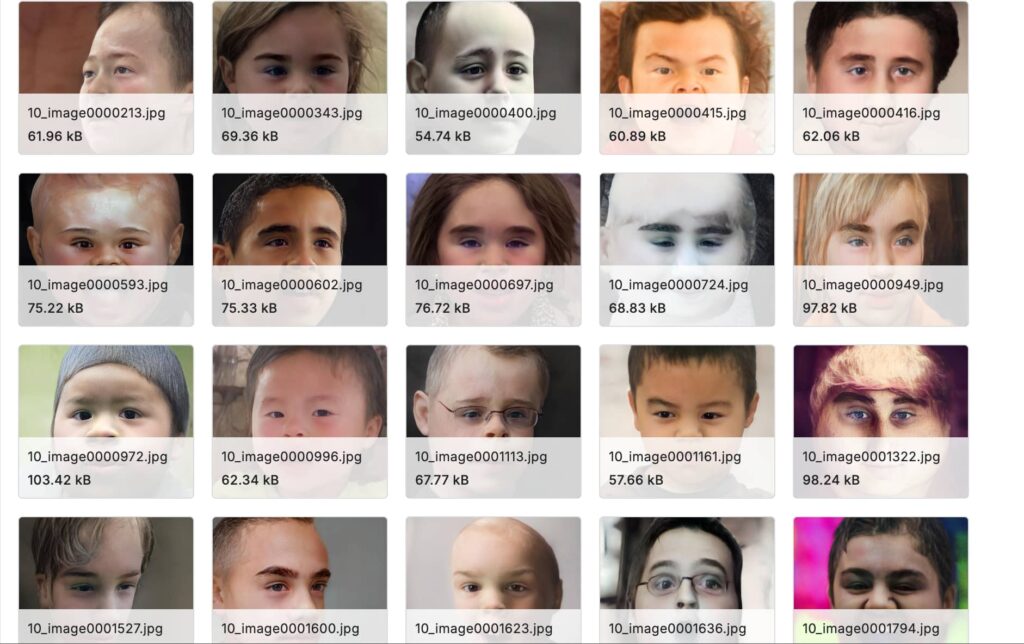
本模型使用的是Young AffectNet HQ 数据集,高质量标注:对儿童面部表情进行了精细标注,包括多种基本表情(如高兴、悲伤、惊讶、害怕、厌恶、愤怒等)以及相关的面部动作单元,这为深入研究儿童面部表情的细微特征和变化规律提供了准确依据。
本数据集包含: anger contempt disgust fear happy neutral sad surprise,每一个情绪包含 1800个左右的图片
import os
import numpy as np
import cv2
import glob
import tensorflow as tf
from sklearn.preprocessing import LabelEncoder
from tensorflow.keras.utils import to_categorical
from tensorflow.keras.callbacks import EarlyStopping, ReduceLROnPlateau
from tensorflow.keras.applications import EfficientNetB0
from tensorflow.keras.layers import GlobalAveragePooling2D, Dense, Dropout, BatchNormalization
from tensorflow.keras.optimizers import Adam
from tensorflow.keras.regularizers import l2
import matplotlib.pyplot as plt
from sklearn.model_selection import train_test_split
from sklearn.metrics import confusion_matrix, classification_report
import seaborn as sns

# 定义基础目录
base_dir = "./"
os.makedirs(base_dir, exist_ok=True)

# 定义图像大小
image_size = 224

# 从指定目录加载图像的函数
def load_images_from_directory(directory):
    """
    从给定目录加载图像,返回图像数组和对应的标签数组。
    """
    images = []
    labels = []
    for emotion_folder in os.listdir(directory):
        emotion_path = os.path.join(directory, emotion_folder)
        if os.path.isdir(emotion_path):
            for image_path in glob.glob(os.path.join(emotion_path, '*')):
                img = cv2.imread(image_path)
                if img is None:
                    continue
                img = cv2.resize(img, (image_size, image_size))
                img = cv2.cvtColor(img, cv2.COLOR_BGR2RGB)
                images.append(img)
                labels.append(emotion_folder)
    return np.array(images), np.array(labels)

# 缓存图像和标签的函数
def cache_images(directory, cache_filename):
    """
    加载指定目录的图像和标签,并将其缓存为压缩的 numpy 文件。
    """
    images, labels = load_images_from_directory(directory)
    np.savez_compressed(cache_filename, images=images, labels=labels)
    print(f'将数据缓存到 {cache_filename}')

# 加载缓存图像和标签的函数
def load_cached_images(cache_filename):
    """
    加载缓存的图像和标签数据。
    """
    data = np.load(cache_filename)
    images = data['images']
    labels = data['labels']
    return images, labels

# 定义缓存文件名
train_cache_filename = os.path.join(base_dir, 'train_data.npz')
test_cache_filename = os.path.join(base_dir, 'test_data.npz')

# 检查缓存文件是否存在,若不存在则创建
if not os.path.exists(train_cache_filename) or not os.path.exists(test_cache_filename):
    cache_images(os.path.join(base_dir, 'data/train'), train_cache_filename)
    cache_images(os.path.join(base_dir, 'data/test'), test_cache_filename)

# 从缓存加载图像
train_images, train_labels = load_cached_images(train_cache_filename)
test_images, test_labels = load_cached_images(test_cache_filename)

# 合并训练集和测试集后重新划分
all_images = np.concatenate([train_images, test_images], axis=0)
all_labels = np.concatenate([train_labels, test_labels], axis=0)

# 将数据划分为训练集、验证集和测试集
train_images, temp_images, train_labels, temp_labels = train_test_split(all_images, all_labels, test_size=0.3, random_state=42)
val_images, test_images, val_labels, test_labels = train_test_split(temp_images, temp_labels, test_size=0.5, random_state=42)

# 检查并打印标签数量的函数
def print_label_counts(labels, set_name):
    """
    打印给定数据集的标签数量信息。
    """
    unique_labels, label_counts = np.unique(labels, return_counts=True)
    print(f"{set_name} 数据集的标签数量:{dict(zip(unique_labels, label_counts))}")

print_label_counts(train_labels, "训练集")
print_label_counts(val_labels, "验证集")
print_label_counts(test_labels, "测试集")

# 归一化图像
train_images = train_images.astype('float32') / 255.0
val_images = val_images.astype('float32') / 255.0
test_images = test_images.astype('float32') / 255.0

# 编码标签
label_encoder = LabelEncoder()
encoded_train_labels = label_encoder.fit_transform(train_labels)
encoded_val_labels = label_encoder.transform(val_labels)
encoded_test_labels = label_encoder.transform(test_labels)

# 独热编码标签
train_labels_one_hot = to_categorical(encoded_train_labels)
val_labels_one_hot = to_categorical(encoded_val_labels)
test_labels_one_hot = to_categorical(encoded_test_labels)

# 增强数据的函数
def augment_image(image, label):
    """
    对图像进行数据增强操作,包括随机翻转、亮度、对比度、饱和度、色调调整以及随机裁剪等。
    """
    image = tf.image.random_flip_left_right(image)
    image = tf.image.random_flip_up_down(image)
    image = tf.image.random_brightness(image, max_delta=0.2)
    image = tf.image.random_contrast(image, lower=0.8, upper=1.2)
    image = tf.image.random_saturation(image, lower=0.8, upper=1.2)
    image = tf.image.random_hue(image, max_delta=0.2)
    image = tf.image.random_crop(image, size=[image_size-20, image_size-20, 3])
    image = tf.image.resize(image, [image_size, image_size])
    return image, label

# 创建 TensorFlow 数据集的函数
def create_tf_dataset(images, labels, batch_size=32, is_train=False):
    """
    从图像和标签数组创建 TensorFlow 数据集,可根据是否为训练集进行打乱和数据增强操作。
    """
    dataset = tf.data.Dataset.from_tensor_slices((images, labels))
    if is_train:
        dataset = dataset.shuffle(buffer_size=len(images))
        dataset = dataset.map(augment_image, num_parallel_calls=tf.data.AUTOTUNE)
    dataset = dataset.batch(batch_size)
    dataset = dataset.prefetch(buffer_size=tf.data.AUTOTUNE)
    return dataset

# 创建 TensorFlow 数据集
train_dataset = create_tf_dataset(train_images, train_labels_one_hot, is_train=True)
val_dataset = create_tf_dataset(val_images, val_labels_one_hot, is_train=False)
test_dataset = create_tf_dataset(test_images, test_labels_one_hot, is_train=False)

# 加载预训练的 EfficientNetB0 模型
base_model = EfficientNetB0(weights='imagenet', include_top=False, input_shape=(image_size, image_size, 3))

# 解冻基础模型的部分层
for layer in base_model.layers[-20:]:
    layer.trainable = True

# 定义模型架构
model = tf.keras.Sequential([
    base_model,
    GlobalAveragePooling2D(),
    BatchNormalization(),
    Dense(512, activation='relu', kernel_regularizer=l2(0.01)),
    Dropout(0.5),
    BatchNormalization(),
    Dense(256, activation='relu', kernel_regularizer=l2(0.01)),
    Dropout(0.5),
    Dense(len(label_encoder.classes_), activation='softmax')
])

# 编译模型
initial_learning_rate = 0.001
optimizer = Adam(learning_rate=initial_learning_rate)
model.compile(optimizer=optimizer, loss='categorical_crossentropy', metrics=['accuracy'])

# 定义回调函数
early_stopping = EarlyStopping(monitor='val_loss', patience=15, restore_best_weights=True)
reduce_lr = ReduceLROnPlateau(monitor='val_loss', factor=0.2, patience=5, min_lr=1e-6)

# 训练模型
history = model.fit(
    train_dataset,
    epochs=50,
    validation_data=val_dataset,
    callbacks=[early_stopping, reduce_lr]
)

# 评估模型
test_loss, test_accuracy = model.evaluate(test_dataset)
print(f'测试准确率:{test_accuracy}')

# 绘制训练历史
plt.figure(figsize=(12, 4))
plt.subplot(1, 2, 1)
plt.plot(history.history['accuracy'], label='训练准确率')
plt.plot(history.history['val_accuracy'], label='验证准确率')
plt.title('模型准确率')
plt.xlabel('轮次')
plt.ylabel('准确率')
plt.legend()

plt.subplot(1, 2, 2)
plt.plot(history.history['loss'], label='训练损失')
plt.plot(history.history['val_loss'], label='验证损失')
plt.title('模型损失')
plt.xlabel('轮次')
plt.ylabel('损失')
plt.legend()

plt.tight_layout()
plt.savefig(os.path.join(base_dir, 'training_history.png'))
plt.close()

# 保存模型
model.save(os.path.join(base_dir, 'emotion_recognition_model_v2.h5'))
print("模型已保存为 'emotion_recognition_model_v2.h5'")

# 混淆矩阵
y_pred = model.predict(test_dataset)
y_pred_classes = np.argmax(y_pred, axis=1)
y_true = np.argmax(test_labels_one_hot, axis=1)

cm = confusion_matrix(y_true, y_pred_classes)
plt.figure(figsize=(10, 8))
sns.heatmap(cm, annot=True, fmt='d', cmap='Blues')
plt.title('混淆矩阵')
plt.xlabel('预测值')
plt.ylabel('真实值')
plt.savefig(os.path.join(base_dir, 'confusion_matrix.png'))
plt.close()

# 分类报告
print("\n分类报告:")
print(classification_report(y_true, y_pred_classes, target_names=label_encoder.classes_))
一、数据准备
- 定义基础目录和图像大小等参数。
- 实现从指定目录加载图像的函数
load_images_from_directory,该函数遍历给定目录下的每个情感文件夹,读取其中的图像,进行尺寸调整和颜色空间转换后,将图像和对应的标签分别存入数组中返回。 - 实现缓存图像和标签的函数
cache_images,它将加载的图像和标签数据缓存为压缩的 numpy 文件。 - 实现加载缓存图像和标签的函数
load_cached_images,用于从缓存文件中读取数据。 - 检查缓存文件是否存在,若不存在则创建缓存文件,并从缓存加载训练集和测试集的图像数据。
- 合并训练集和测试集后重新划分成训练集、验证集和测试集,并检查和打印各个数据集的标签数量。
- 对图像数据进行归一化处理,使用
LabelEncoder对标签进行编码,再通过to_categorical进行独热编码。
二、数据增强与数据集创建
- 定义数据增强函数
augment_image,对图像进行随机翻转、亮度、对比度、饱和度、色调调整以及随机裁剪等操作。 - 实现创建 TensorFlow 数据集的函数
create_tf_dataset,该函数从图像和标签数组创建 TensorFlow 数据集,根据是否为训练集进行打乱和数据增强操作,并将数据分批和预取。 - 创建训练集、验证集和测试集的 TensorFlow 数据集。
三、模型构建与训练
- 加载预训练的 EfficientNetB0 模型,解冻部分层以进行微调。(之前尝试过冻结整个模型层,但是这样的操作导致模型基本学不到什么东西,accuracy:12.5%左右基本就是随机猜测,所以解冻倒数20层让模型能学到更多的特征)
- 定义新的模型架构,包括基础模型、全局平均池化层、批标准化层、全连接层等。
- 使用 Adam 优化器编译模型,定义回调函数
early_stopping和reduce_lr用于早停和学习率调整。 - 训练模型,将训练集数据传入模型进行训练,并使用验证集进行验证,同时记录训练历史。
四、模型评估与可视化
- 评估模型在测试集上的性能,计算测试准确率。
- 绘制训练历史中的准确率和损失曲线,并保存为图片。
- 生成模型在测试集上的混淆矩阵,并保存为图片。
- 打印分类报告,展示模型在各个类别上的性能指标。最后保存训练好的模型。
五、训练分析:
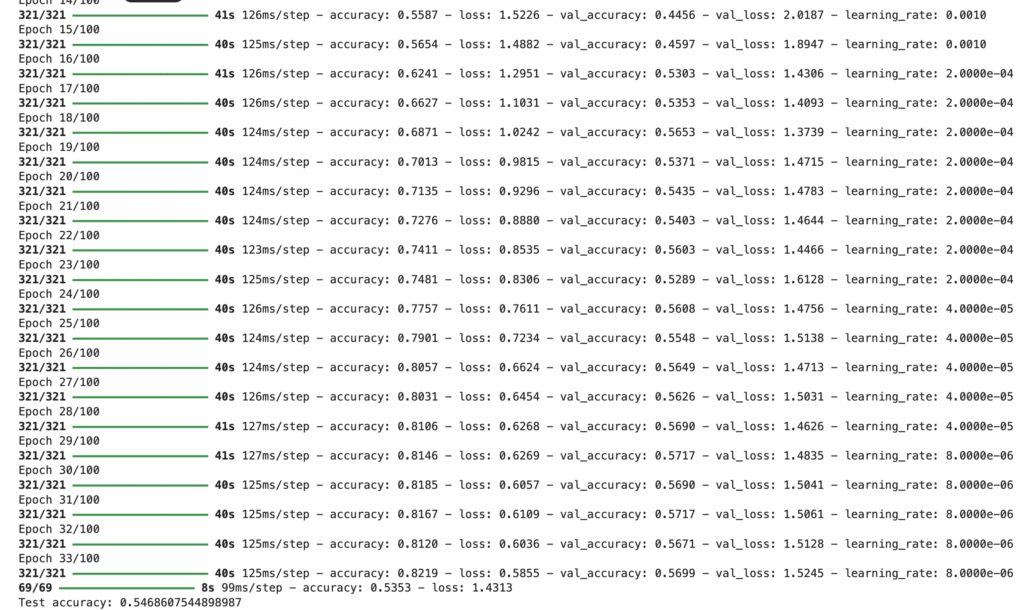
这段训练输出展示了模型在训练过程中准确率逐渐上升、损失值逐渐下降,学习率多次调整,虽取得一定效果但验证准确率与训练准确率仍有差距,模型可能存在过拟合或需进一步优化。
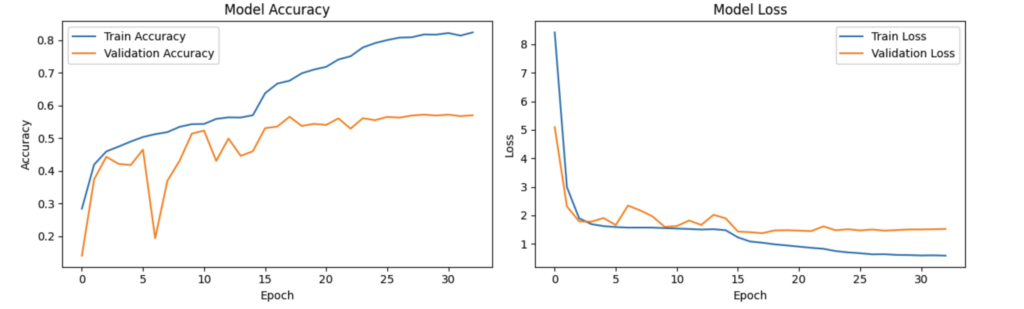
可以看出来训练率0.8而验证率在20epoch左右趋于平稳,这说明有过拟合的情况出现。
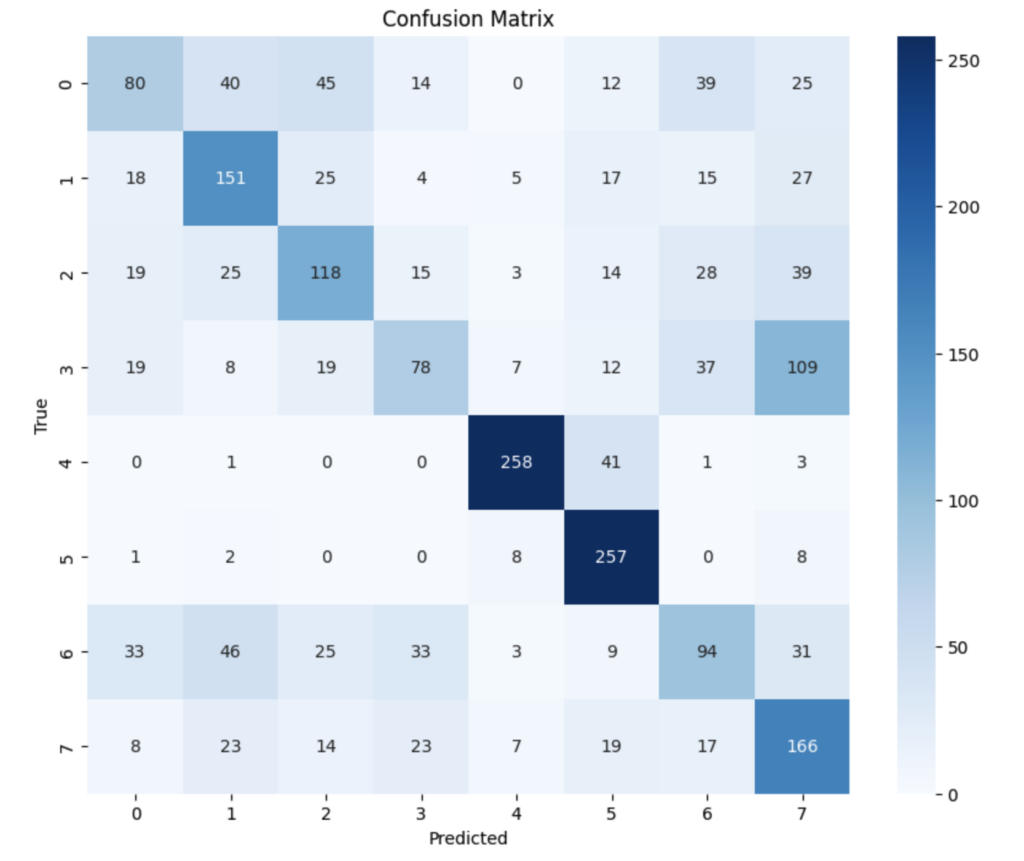
数字编码与情绪类别的对应关系: 0: anger 1: contempt 2: disgust 3: fear 4: happy 5: neutral 6: sad 7: surprise
- 对于 “anger”(0):被误判为 “disgust”(2)有 40 次,“fear”(3)有 45 次,“happy”(4)有 0 次等。
- 对于 “contempt”(1):被误判为 “disgust”(2)有 25 次,“sad”(6)有 17 次等。
- 对于 “disgust”(2):被误判为 “anger”(0)有 19 次,“fear”(3)有 15 次等。
- 对于 “fear”(3):被误判为 “sad”(6)有 109 次,“surprise”(7)有 150 次等。
- 对于 “happy”(4):被误判为其他类别的情况相对较少。
- 对于 “neutral”(5):被误判为 “sad”(6)有 8 次等。
- 对于 “sad”(6):被误判为 “anger”(0)有 33 次,“happy”(4)有 31 次等。
- 对于 “surprise”(7):被误判为 “sad”(6)有 17 次等。
综合来看,模型在某些情绪类别之间的混淆较为严重,比如 “fear” 与 “sad”、“surprise” 之间,“anger” 与其他类别之间也有一定程度的混淆。需要进一步优化模型以提高对不同情绪的区分能力。
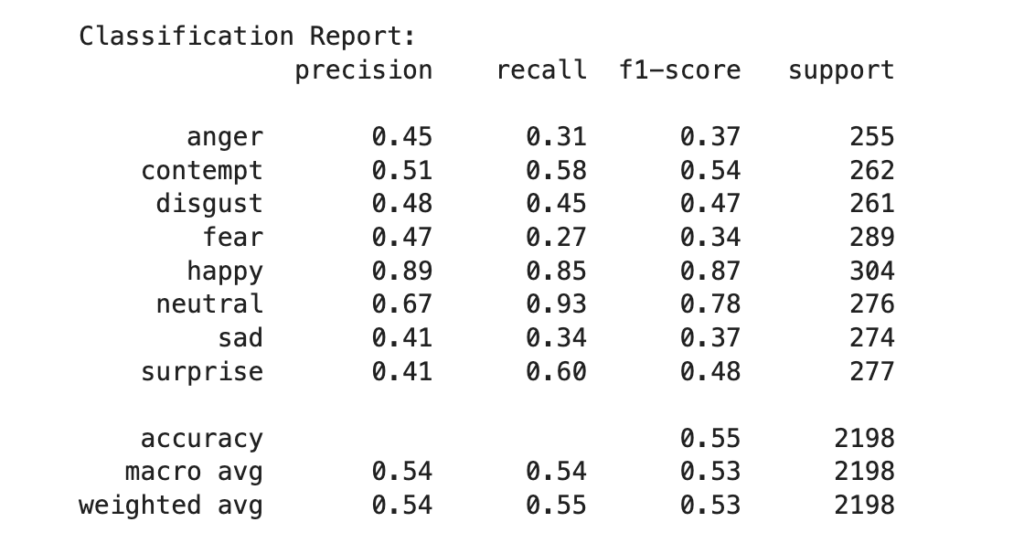
根据这份分类报告和之前的数字编码与情绪类别的对应关系:
对于 “anger”(0):精确率为 0.45,召回率为 0.31,F1 分数为 0.37,支持的样本数为 255,表明模型在识别 “anger” 情绪时存在较多误判和漏判。
“contempt”(1):精确率 0.51,召回率 0.58,F1 分数 0.54,有 262 个样本。
“disgust”(2):各项指标中等。
“fear”(3):召回率仅 0.27,漏判情况严重。
“happy”(4):表现较好,精确率和召回率都较高。
“neutral”(5):召回率高但精确率相对低。
“sad”(6):各项指标不太理想。
“surprise”(7):召回率 0.60 相对较好,但整体仍有提升空间。
总体准确率为 0.55,平均指标也显示模型在不同情绪类别上的综合表现有待提高,需要进一步优化和改进。
六、结论
- 整体准确率不高,仅为 0.55,说明模型的整体性能有待提升。
- 不同情绪类别的表现差异较大:
- “happy”(4)的表现相对出色,精确率和召回率都较高。
- “fear”(3)的召回率极低,漏判情况极其严重。
- “anger”(0)、“disgust”(2)、“sad”(6)和 “surprise”(7)的各项指标都不太理想,存在较多的误判和漏判。
- “contempt”(1)和 “neutral”(5)的表现中等,但也有改进的空间。
- 情绪类别之间存在明显的混淆,特别是 “fear” 与 “sad”、“surprise” 之间,以及 “anger” 与其他类别之间。
这里可以进一步调整:
- 模型架构改进:
- 采用多分支结构,包括主分支、Fear 和 Surprise 分支、负面情绪分支,以学习不同类型情绪的特定特征。
- 在 Fear 和 Surprise 分支中引入注意力机制,聚焦于关键面部区域。
- 在负面情绪分支使用 LeakyReLU 激活函数和残差连接,更好地捕捉细微差别。
- 数据处理改进:
- 采用更多的数据增强技术,如随机旋转、更激进的裁剪和调整大小,增加数据多样性。
- 将图像大小增加到 300×300 像素,提供更多细节信息。
- 训练策略改进:
- 为不同情绪类别分配不同的权重,解决类别不平衡问题。
- 使用 ReduceLROnPlateau 回调动态调整学习率。
- 增加早停的耐心值,给予模型更多训练机会并防止过拟合。
第一点需要更高的硬件配置,我使用的kaggle配制直接就爆了内存。
第二点提升有限,预计提升2%~3%是极限了
第三点这个也是一样,提升预计有限
所以,模型进一步的提升需要:
1、更好的硬件条件进行训练
2、更多的训练样本,更多的训练样本,可以将val_accuracy进一步提升。
2、模型使用部分
import os
import cv2
import numpy as np
import tensorflow as tf
from flask import Flask, request, Response, render_template

app = Flask(__name__)

# 加载人脸检测级联分类器
face_cascade = cv2.CascadeClassifier(cv2.data.haarcascades + 'haarcascade_frontalface_default.xml')

# 加载人脸情绪识别模型
model = tf.keras.models.load_model('./emotion_detection_model.h5')
emotion_labels = ['angry', 'disgust', 'fear', 'happy', 'neutral', 'sad', 'surprise']
input_size = 48

@app.route('/')
def index():
    return render_template('upload.html')

@app.route('/detect_emotion', methods=['POST'])
def detect_emotion():
    if 'image' not in request.files:
        return "No image file provided", 400
    image_file = request.files['image']
    if image_file.filename == '':
        return "No selected image file", 400
    # 保存上传的图片到临时文件
    temp_image_path = "temp_image.jpg"
    image_file.save(temp_image_path)
    # 使用 OpenCV 和模型进行情绪检测
    image = cv2.imread(temp_image_path)
    gray = cv2.cvtColor(image, cv2.COLOR_BGR2GRAY)
    faces = face_cascade.detectMultiScale(gray, scaleFactor=1.1, minNeighbors=5, minSize=(30, 30))
    for (x, y, w, h) in faces:
        cv2.rectangle(image, (x, y), (x + w, y + h), (255, 0, 0), 2)
        face_img = gray[y:y + h, x:x + w]
        resized_face = cv2.resize(face_img, (input_size, input_size))
        normalized_face = resized_face / 255.0
        expanded_face = np.expand_dims(normalized_face, axis=-1)
        expanded_face = np.expand_dims(expanded_face, axis=0)
        prediction = model.predict(expanded_face)
        emotion_label = np.argmax(prediction)
        cv2.putText(image, emotion_labels[emotion_label], (x, y - 10), cv2.FONT_HERSHEY_SIMPLEX, 0.9, (255, 0, 0), 2)
    # 保存标注后的图片为临时文件
    result_image_path = "result_image.jpg"
    cv2.imwrite(result_image_path, image)
    # 删除上传的临时图片
    os.remove(temp_image_path)
    # 返回标注后的图片
    with open(result_image_path, 'rb') as f:
        result_image = f.read()
    os.remove(result_image_path)
    return Response(result_image, mimetype='image/jpeg')

if __name__ == '__main__':
    app.run(host="0.0.0.0",debug=True)
一、技术选型与实现
- 选用 OpenCV 加载人脸检测级联分类器(haarcascade_frontalface_default.xml),以实现对输入图像中人脸的准确检测。
- 采用 TensorFlow 训练的人脸情绪识别模型(emotion_detection_model.h5)进行情绪预测,该模型能够对七种常见情绪(angry、disgust、fear、happy、neutral、sad、surprise)进行有效识别。
- 利用 Flask 框架构建 Web 应用,实现前后端的数据交互和功能逻辑。
二、功能流程
- 用户通过
/路由访问应用,呈现上传图片的页面。 - 当用户在
/detect_emotion路由提交图片(POST 请求)时:- 若未上传图片或图片为空,返回相应错误提示。
- 保存上传的图片为临时文件(temp_image.jpg)。
- 使用 OpenCV 将图像转为灰度图,并进行人脸检测。
- 对检测到的人脸进行裁剪、调整大小为 48×48 像素、归一化处理。
- 将处理后的人脸数据输入模型进行预测,获取情绪类别索引。
- 根据索引获取对应的情绪标签,并在原始图像上标注。
- 保存标注后的图像为临时文件(result_image.jpg)。
- 读取标注后的图像数据返回给用户,并删除临时文件。
3、实际效果:
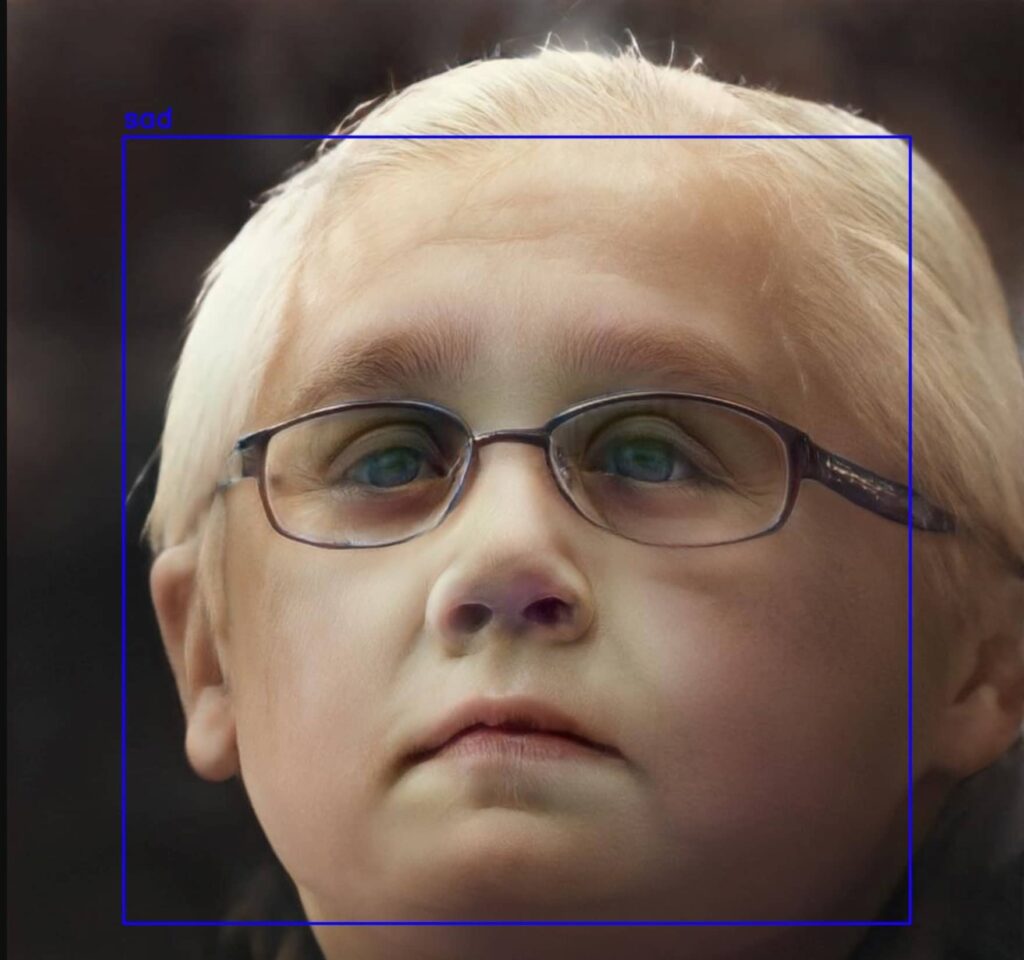
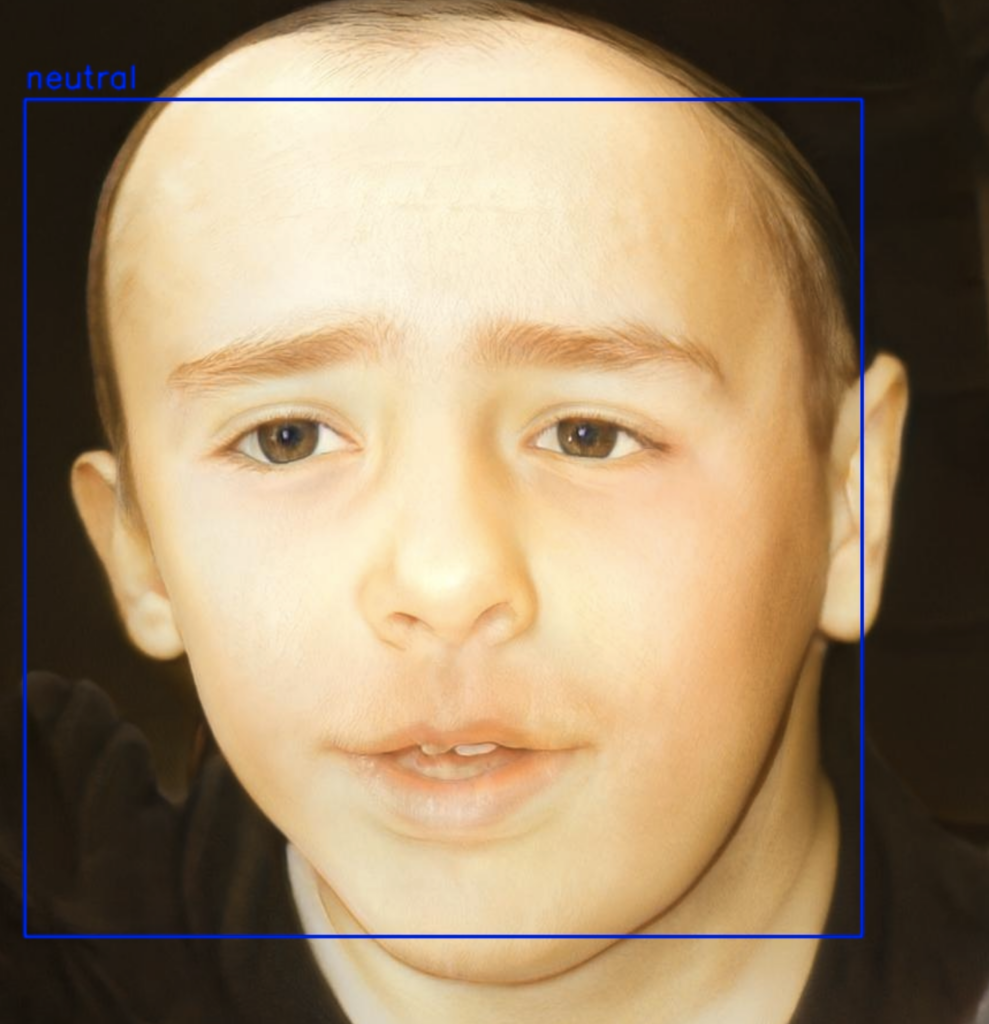
demo地址:http://alaya.zone:8000/